cyberlabs.us | home | subscribe | contact | admin
Saturday, May 18th  
 list | rss  
TACACs+ Server on Ubuntu
Informational

Step 1: Run command: sudo apt-get install tacacs+

Step 2: Edit the tac_plus.conf file but before that we must backup to original file to refer to in case anything breaks.

Step 3: Create a file on which the accounting information will be written to. This is done with the help of below command.

touch /var/log/tac_plus.acct

Step 5: In this step we will edit the tac_plus.conf file at below location.
sudo nano /etc/tacacs+/tac_plus.conf
The tac_plus.conf file looks like below:

lab@lab_VM1:~$ cat /etc/tacacs+/tac_plus.conf

# Created by Henry-Nicolas Tourneur(henry.nicolas@tourneur.be)

# See man(5) tac_plus.conf for more details

# Define where to log accounting data, this is the default.

accounting file = /var/log/tac_plus.acct

# This is the key that clients have to use to access Tacacs+

key = testing123
# We also can define local users and specify a file whe... more

February 25th, 2024 - 03:04 pm | read more | comments  

PowerShell Script Cannot be Loaded
Informational

On trying to run a PowerShell script from the PowerShell console, I received this error message: “File C:tempscript.ps1 cannot be loaded because running scripts is disabled on this system. For more information, see about_Execution_Policies at https://go.microsoft.com/fwlink/?LinkID=135170.”

Root Cause:

This is due to the Windows PowerShell execution policy being set to prevent untrusted scripts that can affect your Windows client environment. Execution policies are security settings that determine the trust level for scripts run in PowerShell. The default execution policy is “strict” on client operating systems like Windows 10, preventing Windows PowerShell commands and scripts from running.

Set the Execution Policy:

Set the execution Policy with the following command:

PS C:/WINDOWS/system32> Set-ExecutionPolicy RemoteSigned
Type “Y” when prompted to proceed. That’s all! This should solve the issue.<... more

January 9th, 2024 - 08:14 pm | read more | comments  

Linux "logger" Command
Informational

NAME
       logger - enter messages into the system log

SYNOPSIS
       logger [options] [message]

DESCRIPTION
       logger makes entries in the system log.

       When  the  optional  message  argument is present, it is written to the log.  If it is not
       present, and the -f option is not given either, then standard input is logged.

OPTIONS
       -d, --udp
              Use datagrams (UDP) only.  By default the connection is tried to  the  syslog  port
              defined in /etc/service... more

August 23rd, 2023 - 09:12 am | read more | comments  

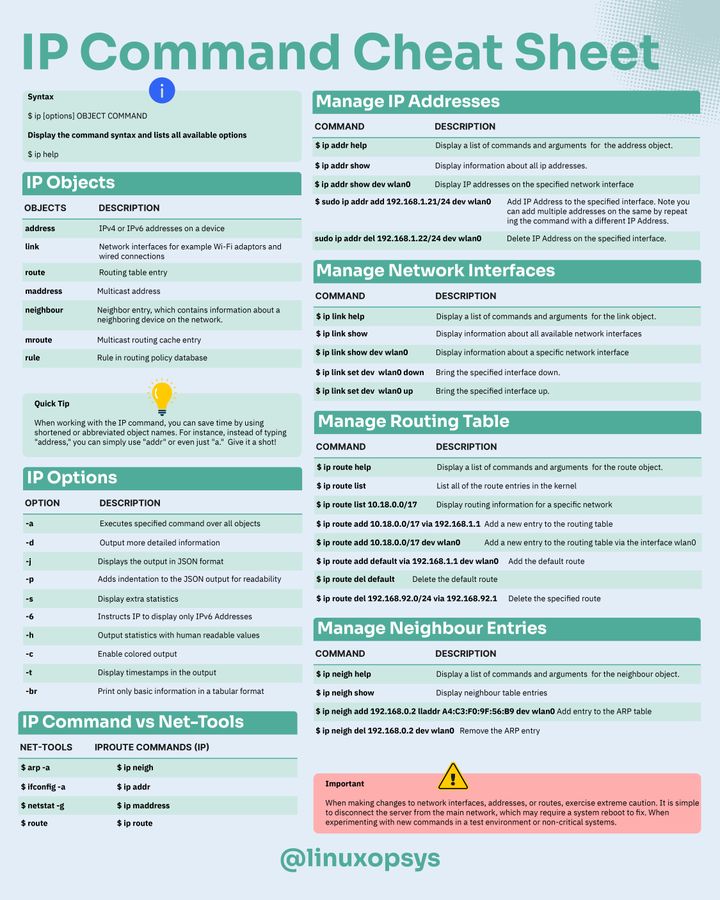
IP Command Cheat Sheet
.

July 20th, 2023 - 09:22 am | read more | comments  

Installation of Portainer Docker Image
Informational

Make sure you have Docker and docker-compose installed.

Create Docker Volume

Portainer stores information on a Docker volume. Type the following command to create a Docker volume for the Portainer Server:

$ docker volume create portainer_data

Step 2: Install Portainer Server
The latest Portainer Community Edition image is available on Docker Hub. Use the docker run command to pull the image and start a Portainer Server container:

$ docker run -d   -p 9443:9443   --name portainer
--restart unless-stopped
-v data:/data   -v /var/run/docker.sock:/var/run/docker.sock
portainer/portainer-ce:latest

$ docker stop portainer

$ docker start portainer


May 24th, 2023 - 11:45 am | read more | comments  

Installation of Shuffle SOAR
Informational

Make sure you have Docker and docker-compose installed.

Download Shuffle

$ git clone https://github.com/Shuffle/Shuffle

$ cd Shuffle

Fix prerequisites for the Opensearch database (Elasticsearch):

$ mkdir shuffle-database

$ sudo chown -R 1000:1000 shuffle-database

Run docker-compose.

$ docker-compose up -d

Recommended for Opensearch to work well

$ sudo sysctl -w vm.max_map_count=262144  

April 5th, 2023 - 05:28 pm | read more | comments  

ASCII Conversion Chart
.

April 4th, 2023 - 11:19 am | read more | comments  

Unsupported and/or invalid disk type on ESXi
Informational

A virtual machine fails to power on with the error: Unsupported and/or invalid disk type (1028943).

This issue occurs if a virtual machine that is meant for VMware Hosted products such as VMware Workstation, VMware Player or VMware Fusion is powered-on on an ESX/ESXi host.

Connect to the ESX/ESXi host via SSH.

For more information, see Using Tech Support Mode in ESXi 4.1 and ESXi 5.x (1017910).

Run this command:

vmkfstools -i HostedVirtualDisk ESXVirtualDisk

Where HostedVirtualDisk is the path to the vmdk on the host and ESXVirtualDisk is the vmdk to be output by the command.

For example:

vmkfstools -i /vmfs/volumes/datastore/virtual_machine_folder/virtual_machine.vmdk /vmfs/volumes/datastore/new_virtual_machine_folder/virtual_machine.vmdk

Detach the currently attached VMDK from the virtual machine:

In the vSphere Client or vSphere Web Client, right-click the virtual mac... more

March 21st, 2023 - 08:19 pm | read more | comments  

Simple installation of Pihole on Ubuntu
Informational

First, update your system. It’s a good practice to follow before installing anything on your system, just to avoid dependency issues and version incompatibility.

You can do this easily in a terminal:

# apt update
# apt upgrade

Then you’ll also need to install curl on your system if not already there:

# apt install curl

Once your system is ready, the installation can be done with only one command, by copying and pasting this into a terminal:

# curl -sSL https://install.pi-hole.net | bash

Follow the prompts....

March 21st, 2023 - 05:32 pm | read more | comments  

OpenCTI Docker Deployment
Informational

Install Docker Compose

$ sudo apt-get install docker-compose

Clone the repository

$ git clone https://github.com/OpenCTI-Platform/docker.git opencti-docker
$ cd opencti-docker

Configure the environment settings
Before running the docker-compose command, settings must be configured. Copy the sample settings file and change it accordingly to your needs.

$ vi .env

OPENCTI_ADMIN_EMAIL=admin@opencti.io
OPENCTI_ADMIN_PASSWORD=changeme
OPENCTI_ADMIN_TOKEN=ChangeMe_UUIDv4
OPENCTI_BASE_URL=http://localhost:8080
MINIO_ROOT_USER=opencti
MINIO_ROOT_PASSWORD=changeme
RABBITMQ_DEFAULT_USER=opencti
RABBITMQ_DEFAULT_PASS=changeme
CONNECTOR_EXPORT_FILE_STIX_ID=dd817c8b-abae-460a-9ebc-97b1551e70e6
CONNECTOR_EXPORT_FILE_CSV_ID=7ba187fb-fde8-4063-92b5-c3da34060dd7
CONNECTOR_EXPORT_FILE_TXT_ID=ca715d9c-bd64-4351-91db-33a8d728a58b
CONNECTOR_IMPORT_FILE_STIX_ID=72327164-0b35-482b-... more

March 18th, 2023 - 04:34 pm | read more | comments  

How to check ESXi VMFS for Corruption
Informational

First, you need to know the path to the partition (naa.xxxxxx:1). Run the following command to display a list with Volume Name, VMFS UUID and Device Name:

esxcli storage vmfs extent list

[root@ESXi-04:~] esxcli storage vmfs extent list
Volume Name            VMFS UUID                            Extent Number  Device Name                                                               Partition
---------------------  --... more

March 13th, 2023 - 06:40 pm | read more | comments  

802.11 WiFi Data Rates
.

March 12th, 2023 - 10:57 pm | read more | comments  

Eliminate Check Point logs before indexing them into Splunk
Informational

Here is an example of how to ignore all events that the "message_info" field is equal to "Address spoofing":

props.conf:
[checkpoint:syslog]
TRANSFORMS-null=setnullCheckpoint

transforms.conf
[setnullCheckpoint]
REGEX=message_info="Address spoofing"
DEST_KEY=queue
FORMAT=nullQueue

March 7th, 2023 - 08:08 pm | read more | comments  

Cloned ESXi Duplicate vmk0 MAC Addresses
Informational

The vmk0 is a virtual interface and a MAC address is generated for it when it is created. When the ESXi template is cloned the vmknic and its configuration (Name, MAC, MTU, and IP settings) are also cloned. Accessing ESXi Shell and running esxcfg-vmknic -l will list the configured vmknics and the configurations (including the MAC) of each.

Enable ssh on the host you want to change:

esxcfg-nics -l lists your physical nics on the machine, with their correct macs.
esxcfg-vmknic -l lists the management nics, which are the ones you want to change.

Copy the good macs, then edit /etc/vmware/esx.conf, and scroll down.
Just replace the macs there.

Save the file, then type “dcui” to get to the console screen, login, then simply restart the management network.

Ctrl-C to go back to the shell, and check again esxcfg-nics -l and esxcfg-vmknic -l.

They should be the same.

March 6th, 2023 - 08:29 pm | read more | comments  

Security Onion Update Procedure
Informational

Security Onion Update Procedure

soup - Security Onion UPdate
Soup will automatically install all available package updates (from both Ubuntu and Security Onion) and all updated Docker images.

sudo soup

Please pay attention to the output of this command as it may request that you take specific action, such as manually restarting services.

Snort/Suricata
Snort package upgrades will back up each of your existing snort.conf files to snort.conf.bak and migrate your HOME_NET and EXTERNAL_NET variables.

Suricata package upgrades will back up each of your existing suricata.yaml files to suricata.yaml.bak and migrate your HOME_NET and EXTERNAL_NET variables.

You'll then need to do the following:

re-apply any other local customizations to your snort.conf/suricata.yaml file(s)

update ruleset and restart Snort/Suricata as follows:

sudo rule-update

Bro
Bro package upgrades w... more

November 1st, 2022 - 03:08 pm | read more | comments  

Add SSL in Apache
Informational

I always forget these two commands:

sudo a2enmod ssl
sudo a2enmod rewrite

If needed, generate a self signed certificate:

cd /etc/apache2/certs
openssl req -new -newkey rsa:4096 -x509 -sha256 -day 365 -nodes -out apache.crt -keyout apache.key


Then the standard stuff in sites-enabled.

November 1st, 2022 - 02:55 pm | read more | comments  

Squirrelmail - Unable to attach file
Informational

1) Create directory in /usr/share/squirrelmail/ for example attach - /usr/share/squirrelmail/attach
2) chmod 733 -R /usr/share/squirrelmail/attach
2) squirrelmail-configure
3) Choose 4(General Options) and press Enter
4) Choose 2(Attachment Directory) and past /usr/share/squirrelmail/attach

October 13th, 2022 - 06:04 pm | read more | comments  

Ubuntu - Turn off laptop screen - no GUI or X
Informational

/home/USER/.boot-scripts/screen-off.sh

#!/bin/bash
setterm --blank 1 --powerdown 2
And make script file executable by systemctl. Create file /etc/systemd/system/screen-off.service

[Unit]
Description=Blank screen after 1 min and turn it off after 2 min. Any keypress will turn it back on.
After=ssh.service

[Service]
Type=oneshot
Environment=TERM=linux
StandardOutput=tty
TTYPath=/dev/console
ExecStart=/home/USER/.boot-scripts/screen-off.sh

[Install]
WantedBy=local.target

Make it executable:

#chmod +x /home/USER/.boot-scripts/screen-off.sh
#chmod +x /etc/systemd/system/screen-off.service

And finally get it working and enabled on boot:

#systemctl start screen-off.service
#systemctl enable screen-off.service

To disable it:

#systemctl disable screen-off.service

February 18th, 2022 - 11:04 am | read more | comments  

Fix for apt-get not working on Kali Linux
Informational

Open a terminal and follow these instructions:

1. #sudo -i

2. #touch /etc/apt/sources.list

3. #chmod 644 /etc/apt/sources.list

4. #echo "deb http://http.kali.org/kali kali-rolling main contrib non-free" > /etc/apt/sources.list

5. #apt-key adv --keyserver hkp://keys.gnupg.net --recv-keys 7D8D0BF6

6. #apt update

February 2nd, 2022 - 02:49 pm | read more | comments  

Upgrade Ubuntu 16.04 to 18.04 via CLI
Information

Step 1: Updating and Upgrading the System
Before upgrading to Ubuntu 18.04, make sure to update the available packages, upgrade the existing system, and clean the disk from unnecessary packages.

  1. Update the software packages repository list:

sudo apt-get update

  2. Then, upgrade already installed packages and let the system handle package dependencies with:

sudo apt-get upgrade -y

sudo apt-get dist-upgrade -y

  3. Finally, free up disk space by removing all unnecessary packages:

sudo apt-get autoremove

Press y to confirm you want to remove the packages.

Step 2: Setting Up Update Manager
Ubuntu allows you to easily upgrade to a newer LTS version using the Update Manager. If you do not have this package installed on the system, follow the steps below.

  1. Run the command for installing Update Manager:

sudo apt-get i... more

February 2nd, 2022 - 10:50 am | read more | comments  

« older posts »
 list | rss