cyberlabs.us | home | subscribe | contact | admin
Monday, July 7th  
« newer posts »   « top »
 list | rss  
TCP Flags Explained
Informational

Host Detection:
Any combination of the ACK bit, except with a RST, would elicit a RST back
from a probed machines whether we
probe an opened port or a closed one.

SYN+FIN+URG would elicit a RST|ACK back whether we probe an opened port or a
closed one.

SYN, SYN+FIN, SYN+PUSH, SYN+URG, SYN+FIN+PUSH, SYN+URG+PUSH,
FIN+URG+PUSH+SYN, all will elicit a RST|ACK from a closed port and a SYN|ACK
from an opened port.

OS Distinguish:
FIN, FIN+URG+PUSH, URG, URG+PUSH, URG+FIN, PUSH, PUSH+FIN and NULL Flags
would all elicit a
RST|ACK on a closed port, *NIX machines will not respond when probed for an
opened port, Windows machines
still reply with RST|ACK.

October 30th, 2020 - 03:09 pm | read more | comments  

FreeRADIUS with Google Authenticator
Informational

FreeRADIUS

First - Enable root account (Required for Google Authenticator)

#sudo passwd root
#sudo passwd -u root

Install Prerequisites

#apt-get update
#apt-get install autotools-dev
#apt-get install autoconf
#apt-get install libtool
#apt-get install ntp
#apt-get install build-essential libpam0g-dev freeradius git libqrencode3

Install the Google Authenticator libpam

#git clone https://github.com/google/google-authenticator-libpam.git
#cd google-authenticator/libpam/
#./bootstrap.sh
#./configure
#make
#make install

Configure FreeRADIUS

Edit /etc/freeradius/radius.conf changing the user and group from freerad to root

#  for some finer-grained access controls.
#
user = root
group = root

#  panic_action: Command to execute if the server dies unexpectedly.
#

Create a group called radius-disa... more

October 30th, 2020 - 11:03 am | read more | comments  

Capture frames containing LACP using tcpdump
Informational

Capture frames containing LACP:

# tcpdump ether proto 0x8809

October 30th, 2020 - 10:58 am | read more | comments  

Capture VLAN tags using tcpdump
Informational

# tcpdump -i bond0 -nn -e vlan

or

# tcpdump -i eno1 -nn -e vlan -w /tmp/vlan.pcap

October 30th, 2020 - 10:56 am | read more | comments  

Mac's and serial TTY's
Informational

Screen

It's not actually necessary to download an install extra software, as you can use the Mac OS X built in Terminal and screen. Screen lacks some features, but it does include VT100/ANSI terminal emulation, and can be extremely useful.

1. Open an OS X terminal session (window)

2. Find the right TTY device. Type: ls /dev/cu.*

With the USB-Serial adapter plugged in, you'll get a list, including something like this:

$ ls /dev/cu.*
/dev/cu.Bluetooth-Modem /dev/cu.iPhone-WirelessiAP
/dev/cu.Bluetooth-PDA-Sync /dev/cu.usbserial
The 'man screen' page

3. Then type: screen /dev/cu.usbserial 9600 (in this example).

The 9600 at the end is the baud rate. You can use any standard rate,
eg, 9600, or 19200 for a Sig Server!

4. To quit the screen app, type CTRL-A, then CTRL-.

Type man screen in Terminal for further information on screen. (use 'enter' or 'space' to scroll, and '... more

October 30th, 2020 - 10:52 am | read more | comments  

Domain fronting with wget
Informational

wget -O - -U "Mozilla/5.0" http://www.cyberlabs.us --header 'Host: www.facebook.com'

October 30th, 2020 - 10:44 am | read more | comments  

How to Create a Network Share Via Samba
Informational

Install Samba

sudo apt-get update
sudo apt-get install samba

Set a password for your user in Samba

sudo smbpasswd -a

Note: Samba uses a separate set of passwords than the standard Linux system accounts (stored in /etc/samba/smbpasswd), so you'll need to create a Samba password for yourself. This tutorial implies that you will use your own user and it does not cover situations involving other users passwords, groups, etc...
Tip1: Use the password for your own user to facilitate.
Tip2: Remember that your user must have permission to write and edit the folder you want to share.
Eg.:
sudo chown /var/opt/blah/blahblah
sudo chown : /var/opt/blah/blahblah
Tip3: If you're using another user than your own, it needs to exist in your system beforehand, you can create it without a shell access using the following command :
sudo useradd USERNAME --shell /bin/false

... more

October 29th, 2020 - 10:41 am | read more | comments  

TMUX Cheat Sheet
.

October 29th, 2020 - 10:36 am | read more | comments  

IMAP for Ubuntu
Informational

Install the packages

sudo apt-get install dovecot-imapd dovecot-pop3d

Configure the protocol you need to be used by appending the protocol in the file /etc/dovecot/dovecot.conf:

protocols = pop3 pop3s imap imaps

Choose the mailbox you would like to use. Dovecot supports maildir and mbox formats. Edit the file /etc/dovecot/dovecot.conf and change the line

mail_location = maildir:~/Maildir # (for maildir)

or

mail_location = mbox:~/mail:INBOX=/var/spool/mail/%u # (for mbox)

Restart the service

sudo /etc/init.d/dovecot restart

Use telnet to check that dovecot is working properly.

telnet localhost imap

September 20th, 2020 - 07:55 pm | read more | comments  

XRDP for Kali
Informational

apt-get update && apt-get upgrade

apt-get dist-upgrade

In order to install the RDP server you run the following command from a terminal window:

apt-get install xrdp

After xrdp is installed you can start the server with the following command:

service xrdp start

service xrdp-sesman start

If want it to auto start after reboot you need to run this command also:
update-rc.d xrdp enable


The only problem is that right now there is a bug in the distro (kali/debian with GNOME) causing both VNC and RDP to cause this error message after login:


Uninstall the Gnome-desktop and use another window manager:

apt-get remove gnome-core

apt-get install xfce4

A full list of windows managers can be found here:

https://forums.kali.org/showthread.php?17716-How-to-install-remove-different-Desktop-Window-Manager-in-Kali-Linux-1-x

This is if you use 3... more

September 20th, 2020 - 11:21 am | read more | comments  

Basic postfix functions
Informational

sudo apt-get update

sudo apt-get install postfix -y

sudo apt-get install mailutils

To reconfigure postfix:
dpkg-reconfigure postfix

In order to make fake hosts in /etc/hosts working instead of leveraging MX records:
smtp_dns_support_level = disabled in /etc/postfix/main.cf.

Some MTAs even query DNS to see if FQDN in the smtpd banner resolves to the IP of your mail server.

Enter the following command to see the FQDN form of your hostname.

hostname -f

If your Ubuntu server doesn’t have an FQDN yet, you can use hostnamectl to set one.

sudo hostnamectl set-hostname your-fqdn


September 18th, 2020 - 07:36 pm | read more | comments  

Basic cron functions
Informational

Example to run every 15th minute:

*/15 * * * *

Example to run on the 1st and the 15th of each month:

0 0 1,15 * 1

(minute) (hour) (day) (month) (day)

*          any value
,          value list separator
-          range of values
/          step values

crontab -a filename

Install filename as your crontab file. On many systems, this command is executed simply as crontab filename (i.e., without the -a option).

crontab -e

Edit your crontab file, or create one if it doesn't already exist.

crontab -l

Display your crontab file.

crontab -r

Remove your crontab file.

crontab -v

Display the last time you edited your crontab file. (This option is available on onl... more

September 15th, 2020 - 10:28 am | read more | comments  

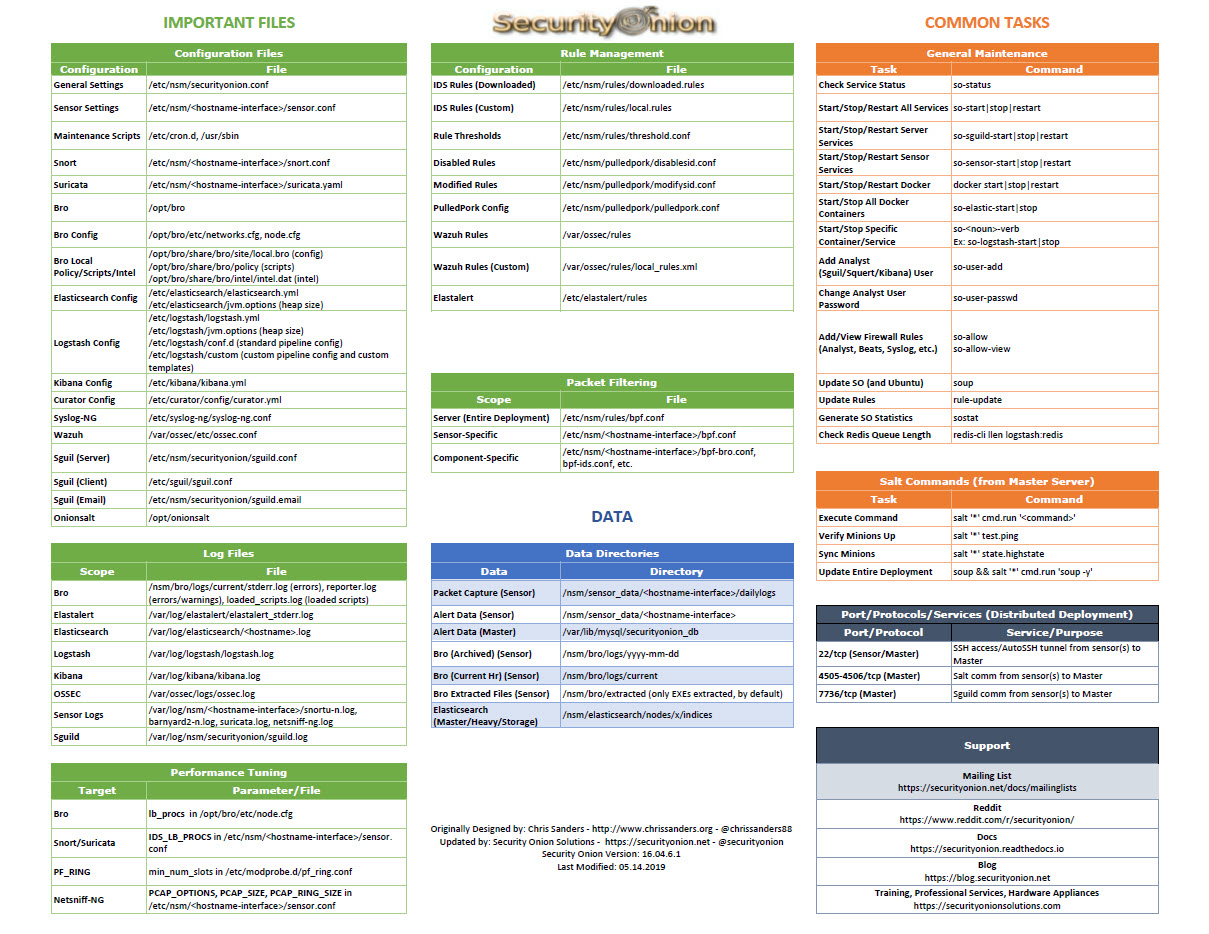
Security Onion Cheat Sheet
.

September 10th, 2020 - 12:41 pm | read more | comments  

Tweaks for Security Onion
Informational

Disable OSSEC as follows:

# Stop the running OSSEC processes
sudo service ossec-hids-server stop

sudo update-rc.d -f ossec-hids-server disable

#-----

XRPD for Security Onion

First Install XRPD and Xfce4

sudo apt-get install xrdp

sudo apt-get install xfce4

After you have installed these packages you need to let Ubuntu know that you’re using the xfce desktop. To do this run this command.

echo xfce4-session >~/.xsession

Then restart xrdp with this command.

sudo service xrdp restart

September 10th, 2020 - 12:40 pm | read more | comments  

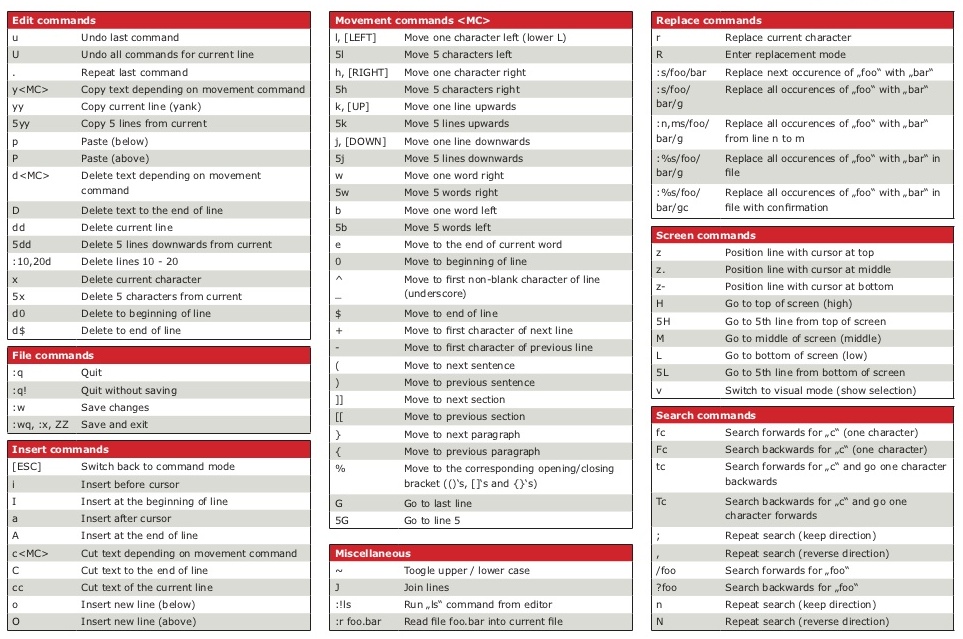
VI Cheat Sheet
.

August 25th, 2020 - 09:06 am | read more | comments  

Splunk: Reset admin Password
Informational

To reset the admin password you will need to have access to the file system:
- move the $SPLUNK_HOME/etc/passwd file to passwd.bak
- restart splunk. After the restart you should be able to login using the default login (admin/changeme).

August 24th, 2022 - 12:04 pm | read more | comments  

Ubuntu: Basics
Informational

-version

lsb_release -a

#--------------

-tftpd

$ sudo apt-get install xinetd tftpd tftp

-Create /etc/xinetd.d/tftp and put this entry

service tftp
{
protocol        = udp
port            = 69
socket_type     = dgram
wait            = yes
user            = nobody
server          = /usr/sbin/in.tftpd
server_args     = /tftpboot
disable         = no
}

-Create a folder /tftpboot  this should match whatever you gave in server_args. mostly it will be tftpboot

$ sudo mkdir /tftpboot
$ sudo chmod -R 777... more

August 24th, 2022 - 06:15 pm | read more | comments  

Splunk: Detect Username Guessing Brute Force Attacks
Informational

sourcetype=wineventlog EventCode=4625 OR EventCode=4624
| bin _time span=5m as minute
| stats count(Keywords) as Attempts,
count(eval(match(Keywords,”Audit Failure”))) as Failed,
count(eval(match(Keywords,”Audit Success”))) as Success by minute user
| where Failed>=4
|stats values(user) AS userlist dc(user) AS Total BY minute
| where Total>5
| eval minute=strftime(minute,”%m/%d/%y %H:%M:%S”)

August 21st, 2022 - 11:59 am | read more | comments  

ufw: logging levels
Informational

ufw logging LEVEL

LOGGING

ufw supports multiple logging levels. ufw defaults to a loglevel of
’low’ when a loglevel is not specified. Users may specify a loglevel
with:

ufw logging LEVEL

LEVEL may be ’off’, ’low’, ’medium’, ’high’ and full. Log levels are
defined as:

off disables ufw managed logging

low logs all blocked packets not matching the default policy (with
rate limiting), as well as packets matching logged rules

medium log level low, plus all allowed packets not matching the default
policy, all INVALID packets, and all new connections. All
logging is done with rate limiting.

high log level medium (without rate limiting), plus all packets with
rate limiting

full log level high without rate limiting

Loglevels above medium generate a lot of logging output, and may
quickly fill up your disk. Loglevel medium may genera... more

August 21st, 2022 - 10:10 am | read more | comments  

Splunk: Remove Indexes and Indexed Data
Informational

splunk clean eventdata
To permanently remove data from a single index, type:

splunk clean eventdata -index
-where is the name of the targeted index.
-Add the -f parameter to force clean to skip its confirmation prompts.

splunk stop
splunk clean eventdata
-This example removes data from the _internal index and forces

-Splunk to skip the confirmation prompt:
splunk stop
splunk clean eventdata -index _internal -f

splunk remove index index_name


August 21st, 2022 - 10:00 am | read more | comments  

« older posts »
 list | rss